Account, Settings, and Production
This section covers the "Account" page where you manage your account, the "Settings" page that controls how the app behaves, and the "Production" tools locked to a higher plan for professional workflows. The button and field names you see on screen are given in their original English; the parenthetical text is explanation only.
Account
Click your account name in the left-hand menu to open the "Account" page. When the page opens, the app refreshes your account in the background; your email verification status and cloud storage indicator fill in with current values.
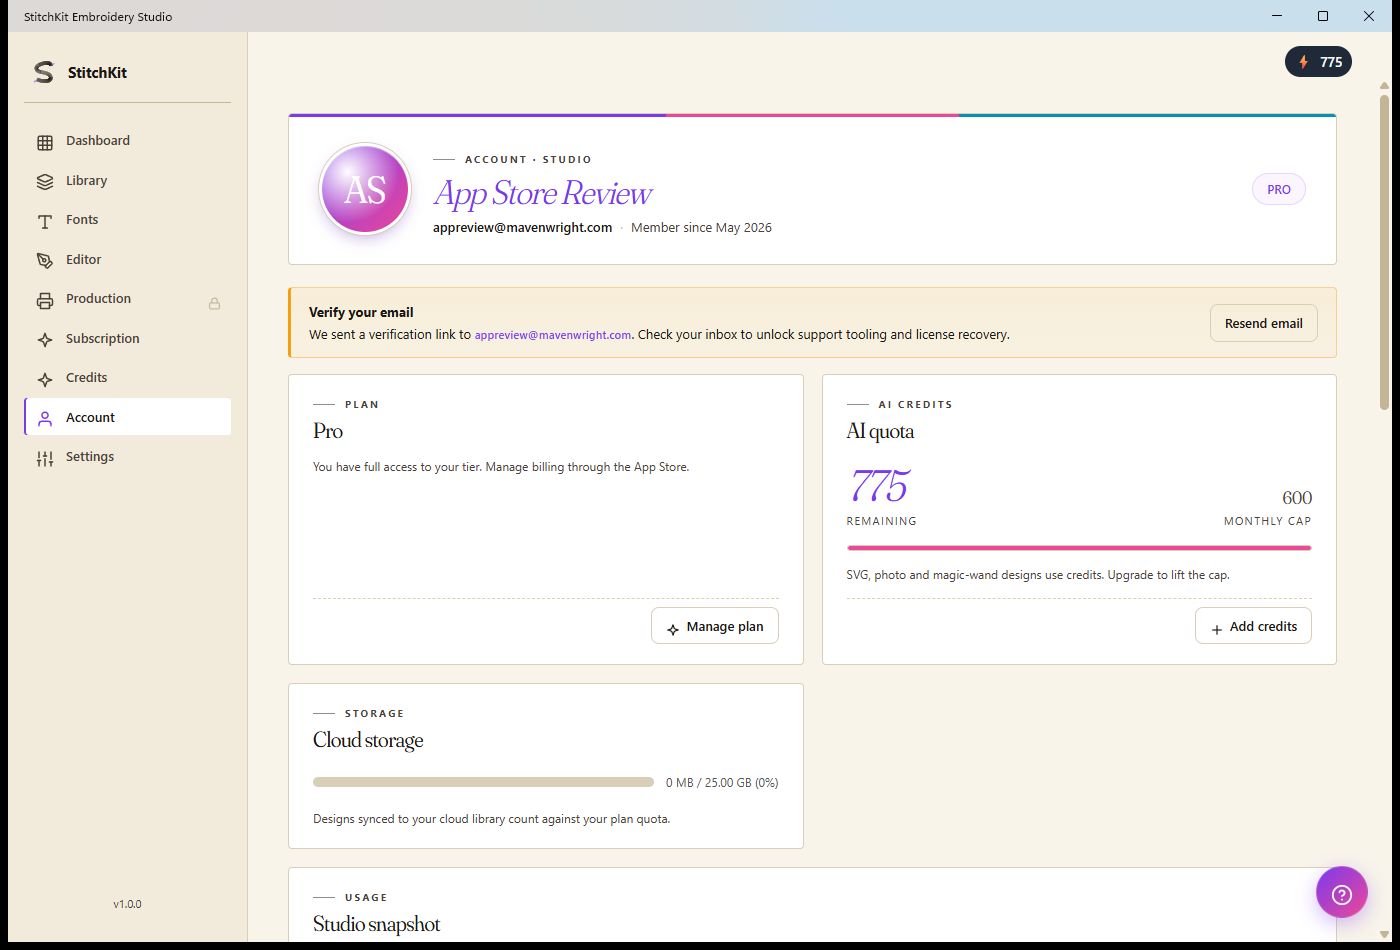
The "Account" page: identity card, plan, AI credits, and cloud storage cards.
Profile and plan
- Identity card — Your name, email address, and "Member since" date appear at the top. The badge in the top right shows your current plan: "Free", "Starter", "Pro", or "Ultimate".
- Plan card — If you're a "Free" user, you'll see an upgrade prompt and an "Upgrade to Pro" button; if you're on a paid plan, a "Manage plan" button takes you to the plans section of the dashboard.
Email verification ("Verify your email")
If your email hasn't been verified yet, a "Verify your email" warning banner appears at the top of the page, showing the address the verification link was sent to.
- Open your email inbox (and the spam folder) and click the link that was sent.
- If the link never arrived, press the "Resend email" button in the banner; the button switches to "Sending…" and the result message ("Sent — check your inbox.") appears below it.
- Once you've verified, the banner disappears the next time you open the page.
Tip — If you press "Resend email" too often, you may get a "Slow down — try again in a minute." warning; wait a minute and try again.
AI quota (AI Credits)
- The "AI Credits" card shows your remaining credits ("remaining") and your plan cap ("cap") as a number and a progress bar.
- AI features such as AI Copilot and semantic search draw from these credits.
- To get more credits, use the "Buy more" button on the card; it takes you to plan management.
Cloud storage and credit/usage
- The indicator on the "Cloud storage" card shows space used against your total quota ("used / quota" and a percentage).
- Once usage passes 80%, the bar turns to a warning color and an upgrade button appears.
- The "Usage" card summarizes the number of designs in your library ("designs") and the AI credits spent so far ("credits used").
Other account actions
- Actions — The buttons to open the library, restore purchases ("Restore purchases"), and sign out ("Log out") live here.
- License keys — Your software licenses are listed; each row shows a masked key, the tier, the status, and the device count. "Regenerate" sends a new key to your email.
- Notifications — Check the relevant box to receive approval notifications by email.
- Danger Zone — To delete your account, the "Delete account" button opens a confirmation dialog; to proceed, you must type the requested confirmation word.
Note — "Delete account" cannot be undone; once confirmed, you're signed out. If you're not sure, don't touch this button.
Settings
On the page opened via "Settings" in the left-hand menu, you personalize how the app behaves. Changes are applied and saved instantly.
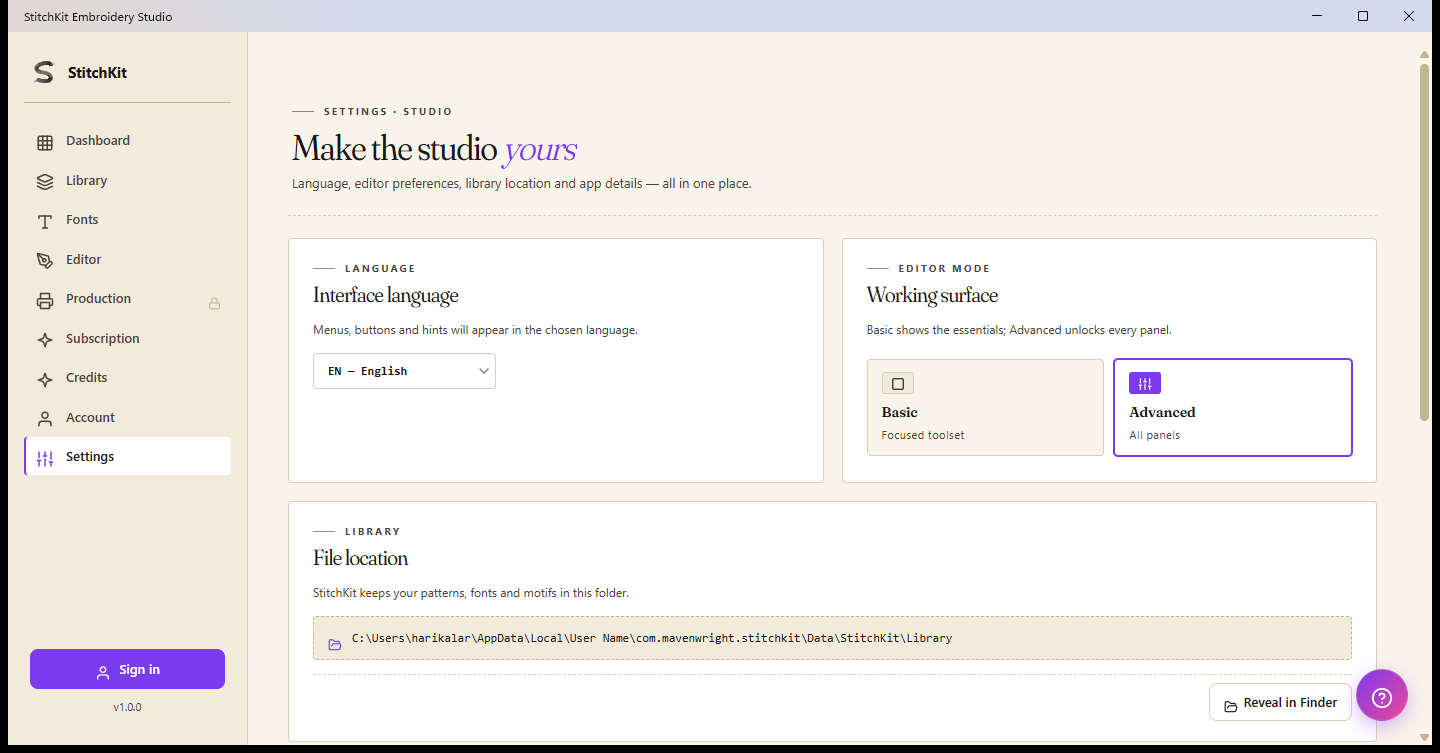
The "Settings" page: language, editor mode, library folder, and default stitch settings.
Interface language
- Choose the language from the dropdown on the "Language" card (e.g. "TR — Türkçe", "EN — English").
- The choice applies instantly; the interface switches to your selected language.
Editor mode — "Basic" and "Advanced"
On the "Editor mode" card you switch between two options (which set how streamlined the working surface is):
- "Basic" — A simpler interface; for everyday, straightforward jobs.
- "Advanced" — A fully loaded layout with all the advanced controls on.
Just click the box you want; the choice is checked and takes effect immediately.
Library folder and "Open folder" (Reveal)
Windows — The "Library folder" card shows the folder path where your designs are saved. The "Open folder" button opens this location in File Explorer (Reveal).
macOS — Designs are saved wherever you choose in the standard "Save" dialog; no fixed location path is shown. Instead, the card has an "Open library" button, and you'll see your recent designs in the "Library".
Default Stitch Settings / Workshop
Pressing the button on the "Stitch & fill defaults" card ("Open") slides out a settings panel. The values here become the defaults for newly created stitches:
- Stitch length and Satin width.
- Tatami spacing and Motif spacing (fill / motif spacing).
- Pull compensation and Fill entry corner (the fill's entry corner: "Auto" or a specific corner).
- Guided fill row spacing.
- Edit the values.
- At the bottom, confirm with "Apply", use "Cancel" to discard, or "Reset" to return to factory values.
Font Storage cache
The "Storage" card shows how much space the downloaded font cache takes up, as "used MB / limit MB".
- Choose the cache cap from the dropdown: "200 MB", "500 MB", "1 GB", or "2 GB".
- To free up space, press the "Clear cache" button; during cleanup the button switches to "Clearing…".
Tip — Clearing the cache doesn't delete your fonts; they're re-downloaded when needed. Under the same card, the "About" section also shows the version, build date, and platform info.
Production suite — locked to a higher plan
The page opened via "Production" in the left-hand menu gathers tools for batch work and shop/agency workflows into a grid. These tools require a higher plan: if you don't have a sufficient tier, a lock card with a "🔒" badge appears at the top of the page, along with an upgrade button naming the required plan; this button opens the payment/upgrade flow.
| Tool | What it does | Required plan |
|---|---|---|
| "Batch Export" | Batch-export a single design to multiple formats | Ultimate |
| "Approval Form" | Customer approval form (PDF) and web approval link | Ultimate |
| "Worksheet" | Shop work order / worksheet PDF | Ultimate |
| "Color Films" | PDF with a separate film sheet per color | Ultimate |
| "Name Drop" | Bulk variant generation with names/numbers from a CSV | Ultimate |
| "Quote" (Cost/Quote Estimator) | Cost breakdown and price quote | Ultimate |
"Batch Export"
- Enter a "Design name" and check the formats to export ("Formats"); you can open the "advanced formats" section for experimental formats.
- Set the filename template ("Naming template", e.g.
{designName}-{ext}) and the output folder ("Output folder"). - Choose the behavior for a file with the same name ("Rename" / "Overwrite" / "Skip"), and check the "Validate round-trip" box if you like.
- Start with "Run"; each file's status appears in the results list.
"Name Drop"
- In the editor, assign a placeholder key to your text blocks ("Mark placeholder"); defined placeholders are listed under "Placeholders found".
- Upload a CSV file ("CSV file"); the first few rows are shown in a preview.
- Set the output folder, the filename template (e.g.
{playerName}-{ext}), and the formats. - Use "Generate batch" to produce a separate file for each row; results are reported row by row.
"Quote" (cost and price quote)
- Fill in the "Customer name", "Design name", "Quantity", and "Valid until" fields.
- Use "Calculate" to compute the breakdown, including thread, machine, labor, material, and markup lines; the total and per-piece price are shown.
- If you like, save the quote with "Save PDF" or create an approval link with "Send web approval".
Tip — To edit the pricing lines, the "Edit rates" link at the top takes you straight to the "Pricing profile" settings page.
"Worksheet" and "Color Films"
- "Worksheet" — Enter the job ID ("Job ID", regenerated with "Regenerate"), customer, due date, target machine, and file path, then save the work order with "Save PDF".
- "Color Films" — Produces a separate sheet for each color in the design; enter the "Job ID" and "Design name", then save with "Save PDF".
Production settings: Machines, Preview Quality, Pricing profile
- Machines ("Machine profiles") — Manage your machine profiles. Add a profile with "+ Add new"; each card shows the brand/model, hoop size, and preferred format, and can be edited with "Edit"/"Delete". The number of profiles is limited by plan (Starter=1, Pro=3, Ultimate=unlimited); once you hit the limit, "Add new" is disabled and an upgrade warning appears.
- Preview Quality — Adjusts the 3D preview look: fabric texture ("Fabric"), camera tilt/rotation ("Pitch"/"Yaw"), light direction ("Light"), and satin sheen ("Satin sheen"). Save with "Save".
- Pricing profile — Holds the rates that underpin quote calculations: currency, thread cost per meter, machine and labor hourly rate, machine speed (RPM), efficiency, setup time/cost, material cost, and profit percentage ("Markup"). Edit them and save with "Save"; these values are used in the "Quote" tool.
Note — Although "Preview Quality", "Pricing profile", and machine profile management are accessible on their own, the tools that produce production output (batch export, quote, approval form, worksheet, color films, name drop) require a higher plan. When you see the lock card, you'll need to upgrade to the required plan.