Platform Differences — Windows, macOS, and Tablet
StitchKit ships to three main platforms from a single app codebase: Windows desktop, macOS desktop, and tablet/phone (iPad, iPhone, Android). The vast majority of the interface and tools are identical on every platform — the same editor, the same "Send to Machine" flow, the same library. But where files live, keyboard shortcuts, touch gestures, and the ways you send to a machine change from platform to platform. This section explains exactly those differences.
Windows — Desktop app; the interface runs inside a WebView2 window. Mouse + keyboard driven.
macOS — A Mac Catalyst app (runs in a sandbox). Trackpad, mouse, and keyboard are supported.
Tablet — A touch app installed from the App Store / Google Play (iPad, iPhone, Android). Used with your finger and — on iPad — the Apple Pencil.
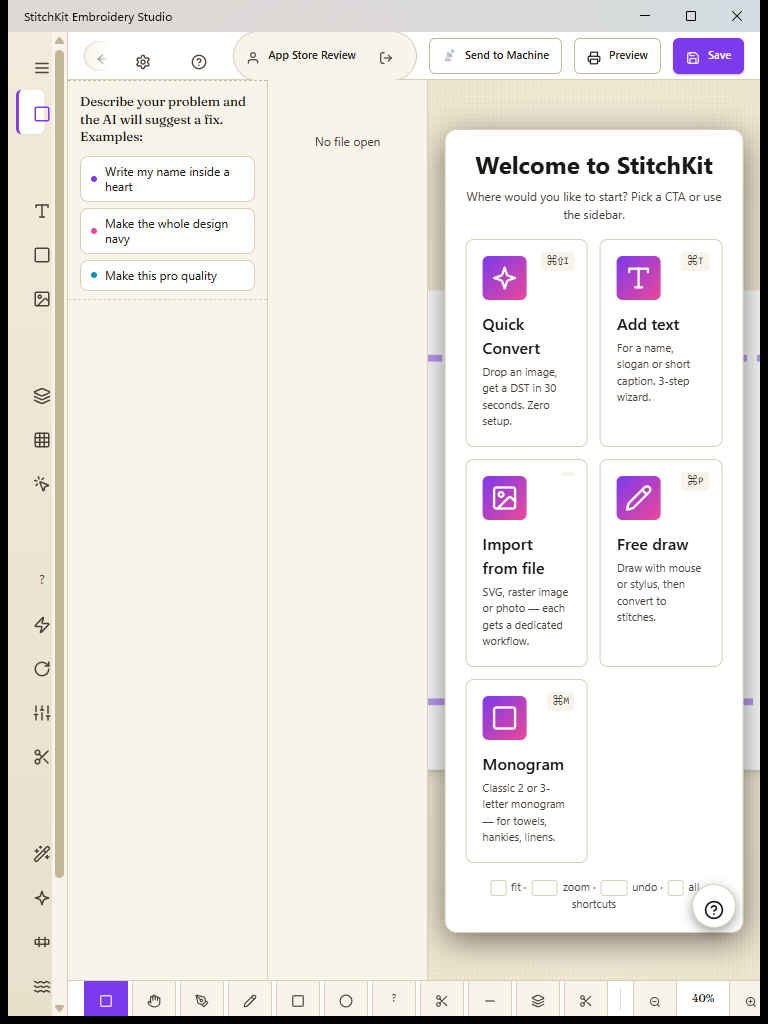
The editor on a tablet: tools scale up to touch size, and panels move into drawers/bottom sheets.
Installation and Launch
| Platform | How to install / run | Interface engine |
|---|---|---|
| Windows | Installed as a desktop app and opens in a normal window. Windows 10 version 1809 (10.0.17763) and later are supported. | WebView2 (Microsoft Edge core) |
| macOS | Installed on your Mac as a Mac Catalyst app; opens from the Applications folder. macOS 12 (Monterey) and later. | WKWebView (Safari core) |
| Tablet / Phone | Downloaded from the App Store or Google Play. iOS 15+ for iPad/iPhone, Android 7 (API 24) and later for Android. | WKWebView (Apple) / system WebView (Android) |
Tip — Your account is shared across all platforms. If you sign in on one device and then sign in with the same account on another, your library is synced via the cloud (depending on your plan). If "Remember me" is checked, your session is kept when you quit and reopen the app.
Where Are Files Stored?
StitchKit's library (designs, BX fonts, motifs) is kept in a different place on each platform. This is because each operating system imposes different folder-access rules on apps.
Windows — The library sits in the
StitchKit\Librarydirectory under the app's data folder; on Windows this folder is located under%LOCALAPPDATA%. No extra permission or folder choice is required.
macOS — Because the app runs in a sandbox, on first launch it asks you to choose a library folder (e.g.,
~/Documents/StitchKit/Library). Access to the folder you choose is stored permanently via a "security-scoped bookmark," so it won't ask again on every launch and your folder always stays visible in Finder. If no folder has been chosen yet, the app container is used temporarily.
Tablet — Files are kept in the app's own sandbox area. On iPad/iPhone, this folder appears under "StitchKit" in the Files app; on Android, it's in the app's internal file area.
Note — Your library belongs to the app. Rather than copying your files by hand, it's best to use the app's import ("Open Folder" / file picker) and export ("Export", "Batch Export") tools.
Opening the library folder: "Reveal in Finder" / "Open Folder"
To open the library folder in your system's file manager, use the "Reveal in Finder" button on the "Settings" page in the editor, or the "Open Folder" button on the library page / About panel. The same button opens the appropriate app on each platform:
- Windows — Opens the folder in File Explorer.
- macOS — Opens the folder in Finder. (That's why the button text is "Reveal in Finder" — it names Finder directly.)
- Tablet (iPad/iPhone) — Opens the Files app; from there you can select the file and preview it with Quick Look or share it.
Tip — The "Reveal in Finder" label is worded in macOS terms, but on Windows the button opens File Explorer and on a tablet it opens the Files app. So even though the text you see says "Finder," the correct file manager opens.
Keyboard Shortcuts: Ctrl (Windows) vs Cmd (macOS)
On desktop platforms the shortcuts do the same thing; only the modifier key differs: Ctrl on Windows, Cmd (⌘) on macOS. StitchKit recognizes both keys. On a tablet with no physical keyboard, the same functions are done with on-screen buttons.
| Action | Windows | macOS | Tablet |
|---|---|---|---|
| Undo | Ctrl + Z | ⌘ + Z | On-screen undo button |
| Redo | Ctrl + Shift + Z | ⌘ + Shift + Z | On-screen redo button |
| Open / Save / New | Ctrl + O / S / N | ⌘ + O / S / N | Menu and toolbar buttons |
| Command palette | Ctrl + K | ⌘ + K | — |
| Settings | Ctrl + , | ⌘ + , | Settings button |
| Delete selection | Delete | Delete | Delete button on the selected block |
Tip — The editor's "Settings" > "Shortcuts" tab has the full list of tool, editing, view, and file shortcuts (e.g., V selection tool, H pan/hoop, R rotate 90°, 0 fit to screen, + / - zoom in/out).
Zoom and Pan
Zooming and navigating on the canvas varies by input device:
Windows — Zoom in/out with the mouse wheel; pan the canvas by dragging (pan tool or middle button).
macOS — In addition to the mouse wheel, two-finger scroll and pinch-to-zoom on the trackpad are supported. The trackpad pinch is wired directly to zooming inside the app.
Tablet — Zoom in and out with a two-finger pinch (pinch-to-zoom), and pan the canvas by dragging with one finger. On iPad, these are backed by native touch gestures.
- The "0" (fit) and +/- buttons/shortcuts work on every platform.
- The zoom level is saved; when you reopen a design, it stays close to your last view.
Sending to a Machine: "Send to Machine"
The "Send to Machine" button in the editor's top bar opens a three-step page: 1. choose the machine profile, 2. choose the destination ("2. Where to?"), 3. review the warnings and hit "Send". The destination options work differently by platform.
| Destination | Windows | macOS | Tablet |
|---|---|---|---|
| USB drive (directly to the machine) | ✔ Connected removable USB volumes are listed automatically; the file is written straight to the drive | ✔ Connected USB volumes are listed and written to | Usually not available (mobile operating systems restrict removable-drive access) |
| "Send via email" (Email) | ✔ Via system sharing | ✔ | Choose email/app from the share sheet |
| AirDrop | — | ✔ (Apple AirDrop) | AirDrop from the share sheet on iPad/iPhone |
| "Save to iCloud" (iCloud) | — | ✔ | iCloud/Files from the share sheet on iPad/iPhone |
Windows — The most straightforward route is writing directly to a USB volume: plug in your machine's USB, let it show up in the "2. Where to?" list (the label shows the volume name, file system, and free space), and the file is written to the drive in your profile's format (DST, PES, JEF, VP3, EXP, XXX, PEC). Direct email sharing is also possible on Windows.
macOS — Both writing to a connected USB volume and AirDrop / Email / iCloud sharing are supported. AirDrop is the fast way to send the file wirelessly to a nearby Mac or iPhone/iPad.
Tablet — Instead of writing directly to USB, you send the file via the share sheet: AirDrop, iCloud/Files, email, or a cloud app. From there you can transfer the file to a computer/USB and move it to your machine.
Note — On the "Send to Machine" page, the AirDrop, Email, and iCloud options may appear in the list on every platform; but in practice only the destinations that platform supports actually work (email on Windows, all three on macOS, system sharing on a tablet). Before sending, check the warnings in step 3 (fits in hoop, stitch-count limit).
Responsive Interface: Desktop vs Tablet/Phone
The same screens rearrange themselves based on window/screen width. On wide desktop windows the side panel and tables are fully visible, while on narrow screens (tablet portrait, phone) the interface simplifies.
- Sidebar → hamburger: On a narrow screen (below roughly 960 pixels) the left navigation sidebar is hidden and turns into a hamburger (☰) button at the top; tap it and the bar slides in from the top.
- Library table → cards: The library list is a table on a wide screen; on a narrow screen (below ~720 pixels) each row turns into a card carrying its own labels, so no horizontal scrolling is needed.
- Metric/plan cards stack vertically: The multi-column cards on the dashboard line up one below the other as a single column on a narrow screen.
- Editor panels move into drawers/bottom sheets: On a narrow screen, layers move into a left drawer and the properties panel becomes a bottom sheet; the tool rail narrows for touch.
- Larger touch targets: On touch (coarse pointer) screens, buttons and tool icons grow to at least 44 pixels tall.
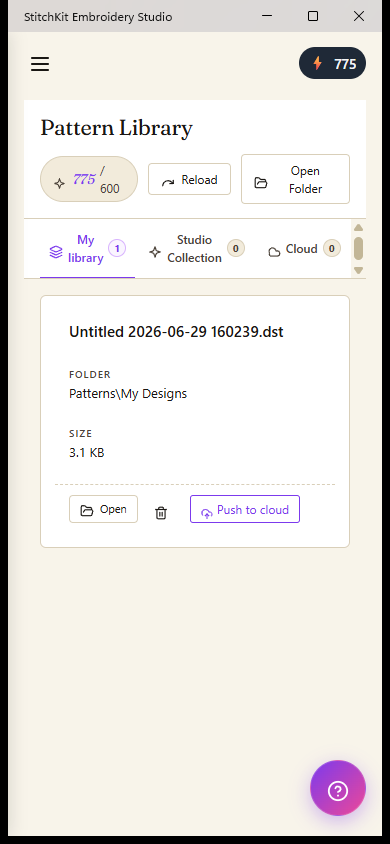
The library at phone width: each design turns into a card.
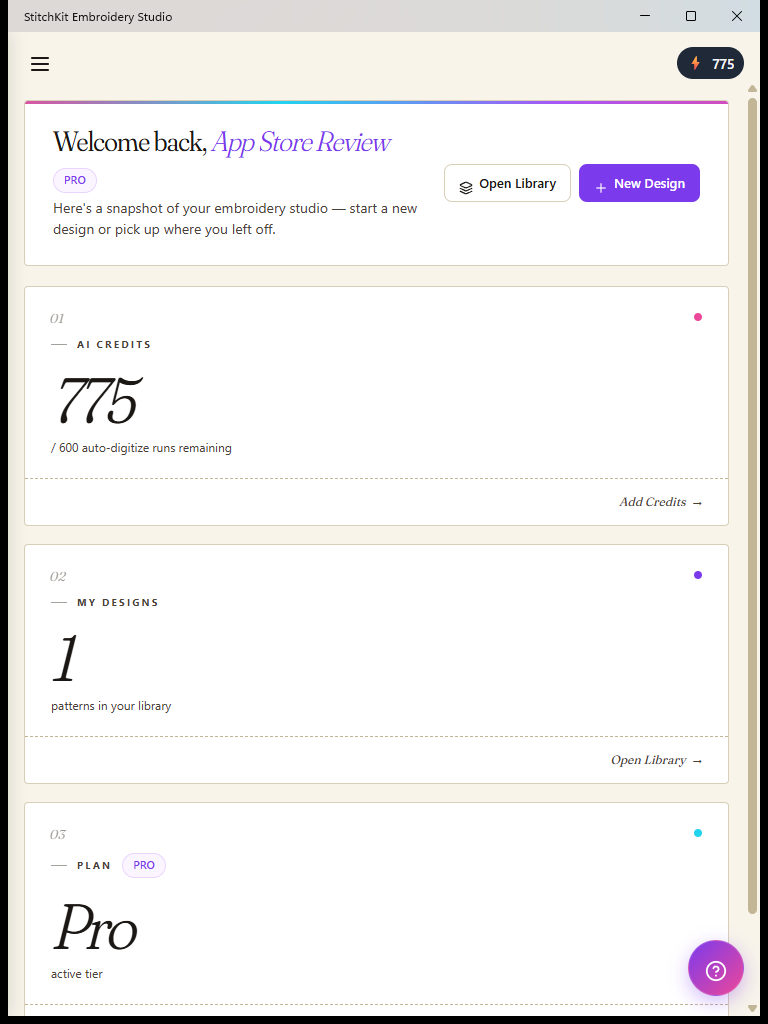
The dashboard on a tablet: the sidebar is tucked behind the hamburger button.
Which Feature on Which Platform?
The general rule: core features are common to every platform — opening/saving files, editing all machine formats (DST, PES, JEF, EXP, VP3, XXX, PEC), lettering/monogramming, digitizing, the library, cloud sync, and AI Copilot (when signed in). The platform-specific points are:
- Sending directly to USB — Clean on Windows and macOS desktop (writing to a connected removable volume). On a tablet, the share sheet is used instead.
- AirDrop / iCloud — Specific to Apple platforms (macOS and iPad/iPhone). Not available on Windows.
- Apple Pencil pressure support — Specific to iPad; in free drawing, line width follows pressure (when the relevant setting is on).
- Subscriptions/purchases — Go through Apple in-app purchase on macOS and iPad/iPhone, and through Google Play on Android. The links to manage your subscription and request a refund direct you to the relevant store.
- BX font import — On desktop (Windows/macOS), BX fonts can be found in and imported from local folders.
Tip — If you're not sure, the rule is simple: designing and editing is the same everywhere; the way you get it to the machine changes by platform. USB on desktop, AirDrop/iCloud on Apple devices, and email and cloud sharing everywhere.