Text, Fonts & Monograms
With StitchKit you can add embroidery-ready lettering and monograms to your design. Adding text runs through a 3-step wizard ("Lettering / Font"), while monograms use a 2-step wizard ("Monogram Wizard"). You manage the fonts you use from the "Font Library" page. This section walks you through all three, step by step.
The text wizard — "Add text"
When you open the "Add text" tool in the editor to add lettering, the three-step "Lettering / Font" wizard appears. Across the top you'll see the "Text" → "Style" → "Stitch" steps. Use the "Next" / "Back" buttons at the bottom right to move between steps, and on the final step apply it to your design with "Finish". To exit the wizard, use the "Cancel" button.
Tip — The "Single page" toggle in the top right lets you view all steps on a single scrollable page. This preference is saved and remembered the next time you open the wizard. Leave it off if you'd rather work through the steps one at a time.
Step 1 — "Text"
In the first step you enter the lettering that will become embroidery.
- Type the text you want in the "TEXT" field.
- Text can be up to 40 characters long. The counter below the field — shown as "5 / 40 characters" — tells you how many characters remain.
- If you like, open the "Tips" panel to see usage suggestions: short words come out cleaner, and numbers and punctuation are supported.
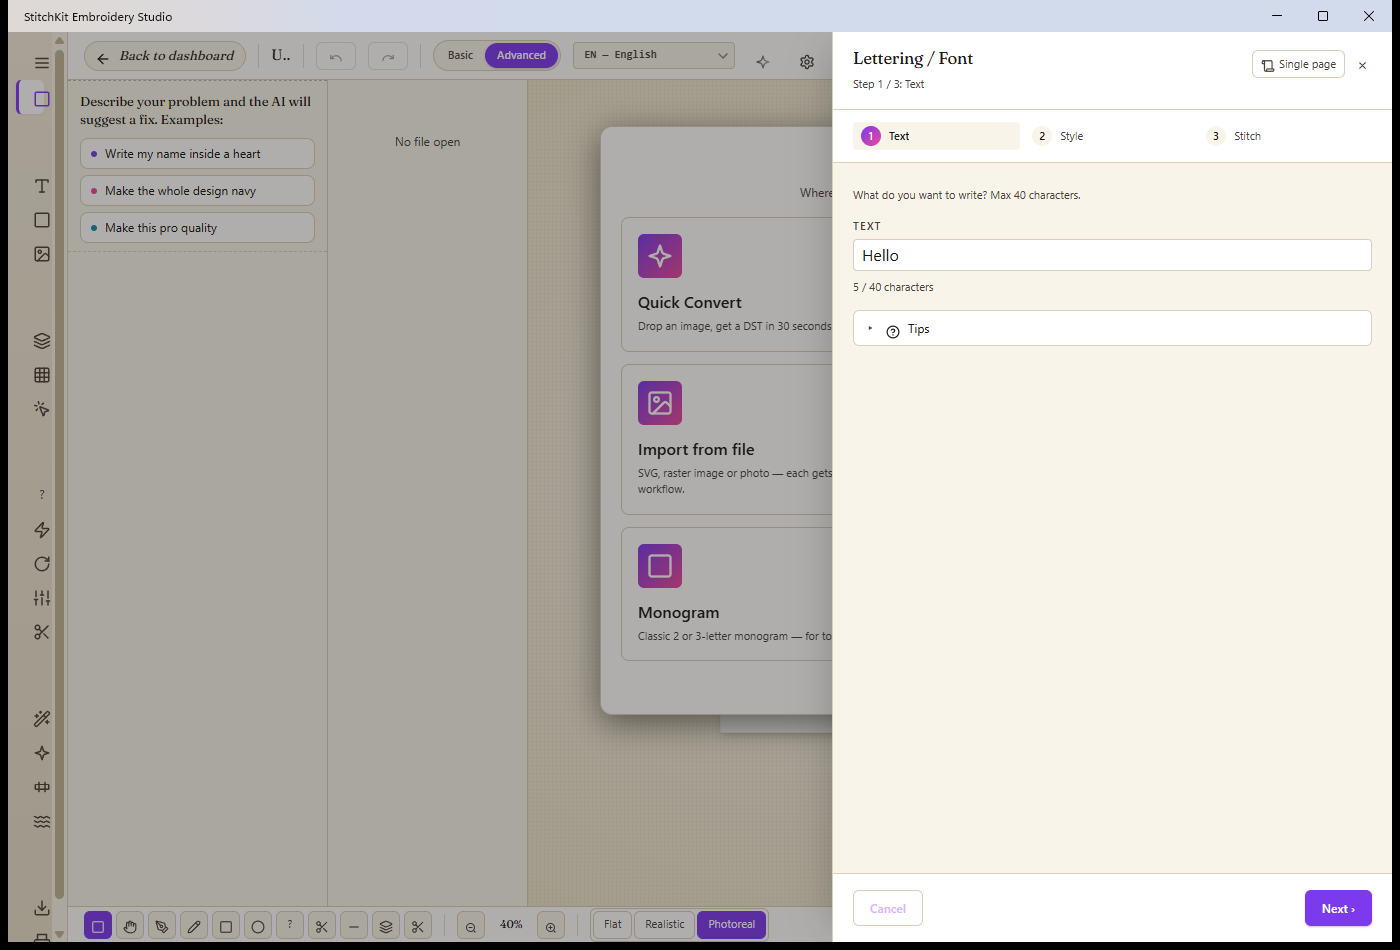
Step 1 "Text": enter the text to be stitched (up to 40 characters).
Note — You can't move to the next step while the text field is empty. Turkish characters (ğ, ş, ı, ç, etc.) work reliably in system fonts, but they may be missing from imported BX fonts. For Turkish lettering it's safer to stick with a system font.
Step 2 — "Style"
In the second step you decide how the lettering will look: font source, size, font family and style options.
- "FONT SOURCE" — There are two options: "System TTF/OTF" (TTF/OTF fonts installed on your system) and — if you've imported a BX font — "BX font (installed)" (installed BX fonts). The number of installed BX fonts appears in parentheses next to the option.
- "SIZE (MM)" — Enter the height of the lettering in millimeters. The valid range is roughly 5–100 mm.
- "FONT" — If you chose a system font, pick a family from the dropdown: Helvetica, Arial, Georgia, Times, Courier or Verdana.
- "BOLD" / "ITALIC" / "VERTICAL" — With system fonts you can toggle bold, italic and vertical (stacking the letters one above the other instead of side by side).
- "Cloud fonts" — Open this panel to choose from catalog fonts you've downloaded and unlocked.
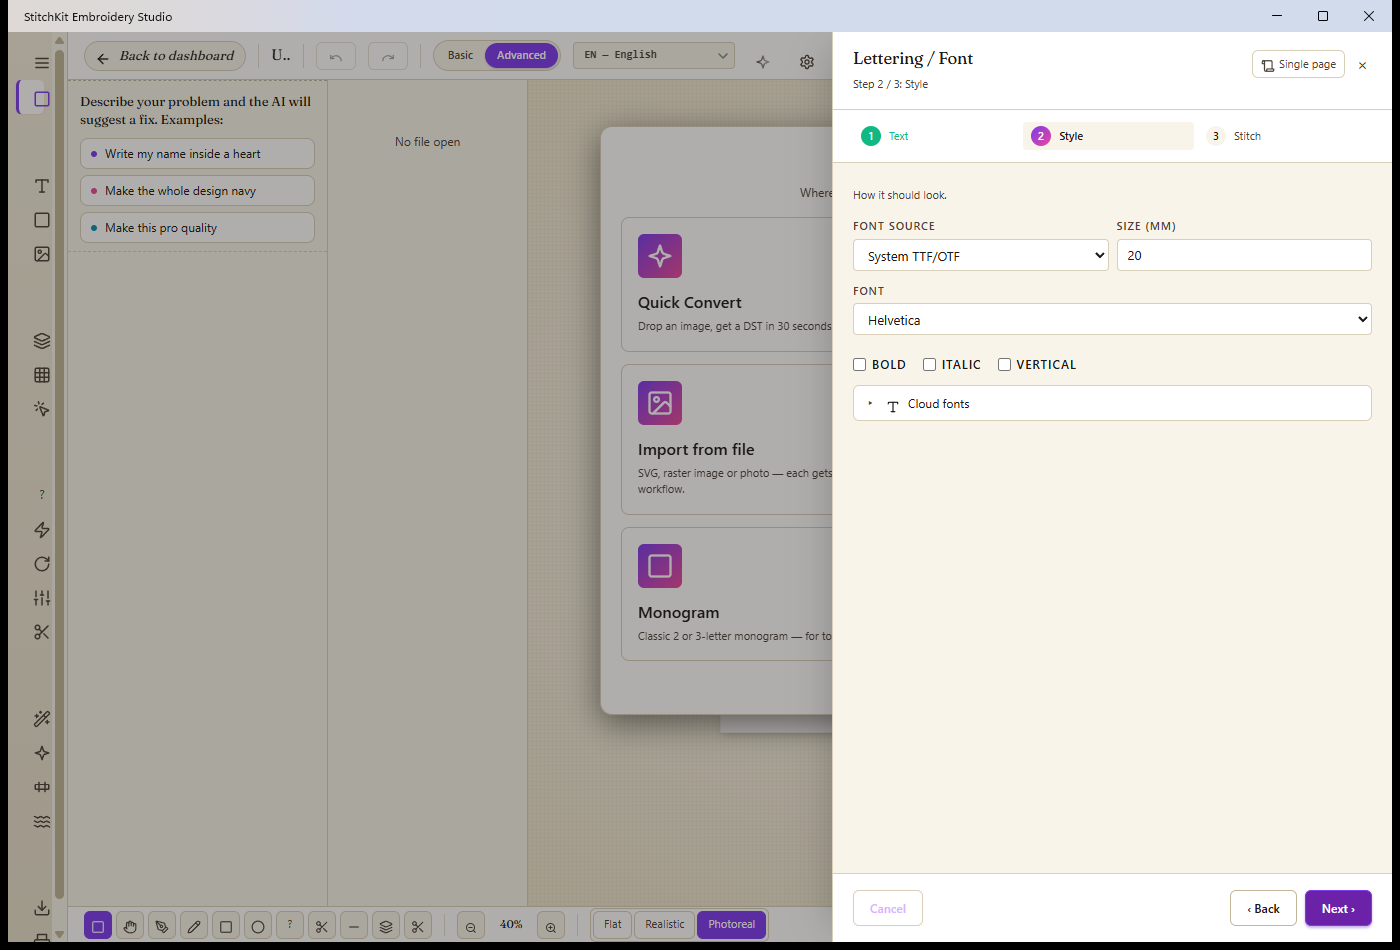
Step 2 "Style": font source, size, font family and Bold/Italic/Vertical.
Windows — The "System TTF/OTF" option works from the fonts installed on your computer. The families listed are standard on every system; if you want a specialized family, use "Cloud fonts" or import a BX font instead.
Note — When you choose a BX font, the "Bold" and "Italic" toggles are unavailable; BX fonts don't support those variants. With a BX font selected, the dropdown shows the font's name and the number of glyphs it contains.
Step 3 — "Stitch"
In the final step you set the stitch type used to fill the lettering, its color, and — if you chose Tatami — the stitch parameters.
- "FILL" — Choose the stitch type: "Tatami fill (classic)", "Satin" (medial-axis zigzag, for thin lettering) or "Outline" (outline only).
- "COLOR" — Click the color swatch to pick a thread color.
When you choose "Tatami fill (classic)", the "Tatami parameters" section opens:
- "STITCH LENGTH (MM)" — The length of a single stitch. 1.5 mm is a good starting value.
- "ROW SPACING (MM)" — The distance between fill rows. 0.5 mm is a good starting point. The larger the value, the sparser the fill.
Also on this step, a "Summary" box shows your choices on a single line (e.g. text, size, font and fill type). If everything looks right, add the lettering to your design with the "Finish" button.
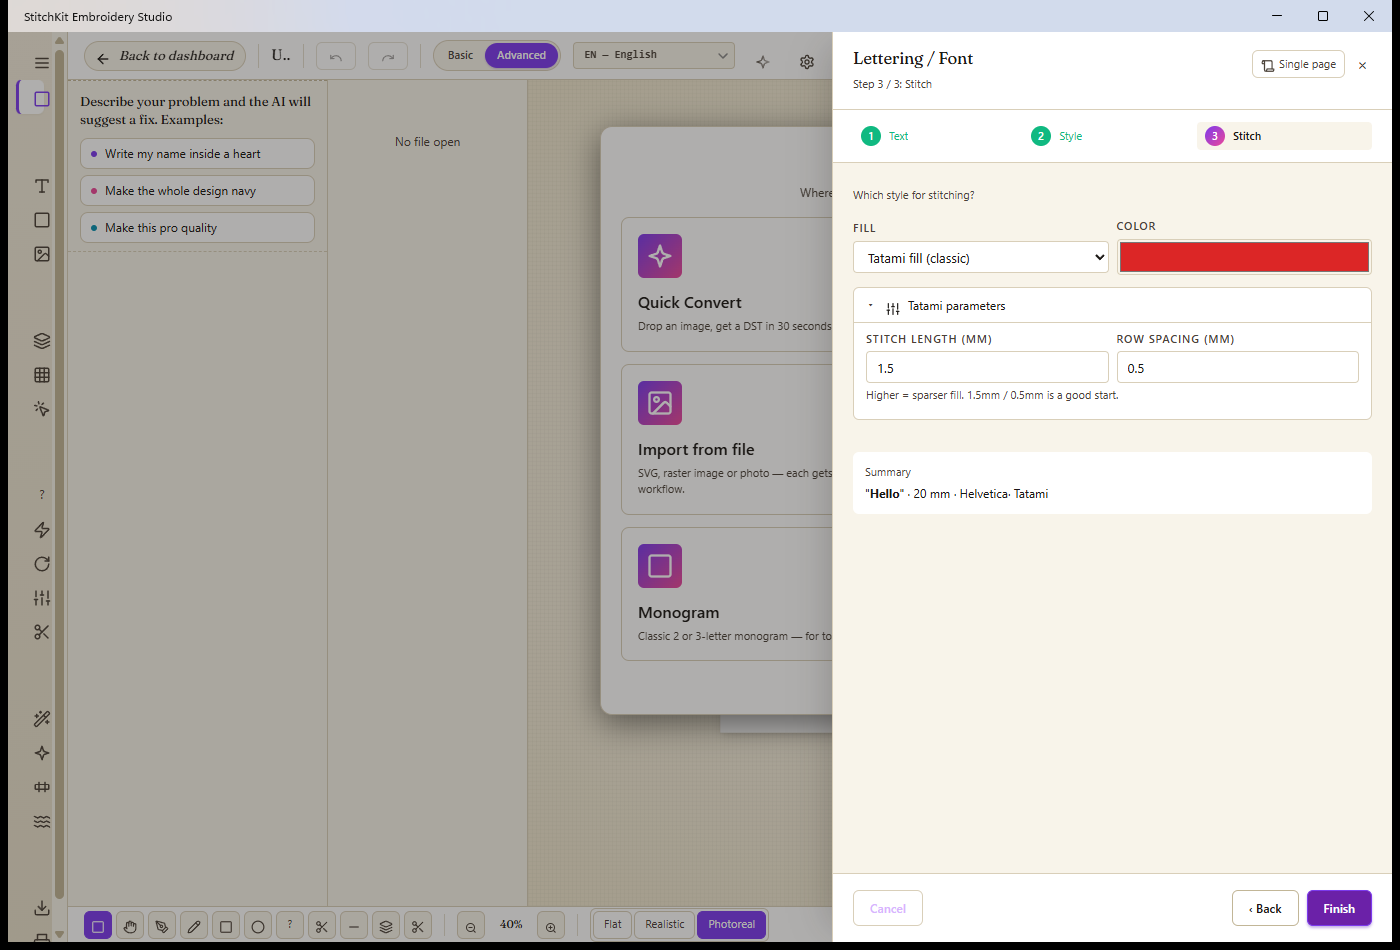
Step 3 "Stitch": fill type, color, Tatami parameters and the "Summary" box.
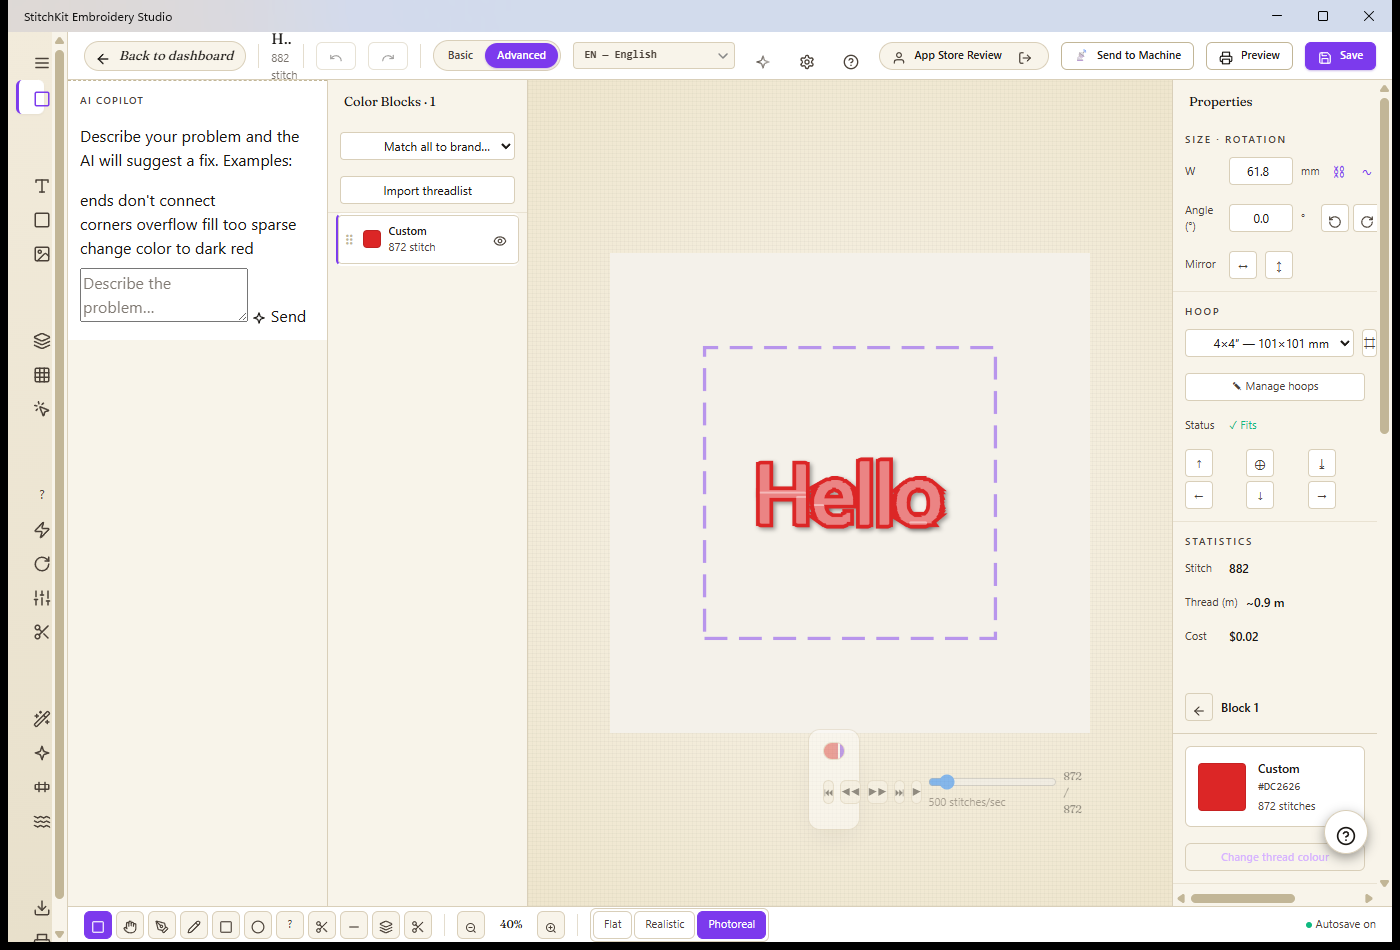
After "Finish": the lettering is added to the editor canvas, ready to edit.
Tip — Once added to the design, lettering behaves like any other object: you can select, move, resize and recolor it. If you'd like to try different values from scratch, reopen the wizard and create a new piece of lettering.
Font Library — "Font Library"
The "Fonts" link in the left menu takes you to the "Font Library" page. Here you can preview and search the available fonts, filter by category, and import your own BX fonts.
Preview cards, search and categories
- Every font is shown as a preview card with sample lettering on it. Below the card you'll find the font family's name and variant (e.g. "Inter — REGULAR", "Inter — BOLD").
- Type in the "Search..." box to filter fonts by name in real time.
- Pick a category from the "All categories" dropdown: "Serif", "Sans", "Script", "Display", "Monogram" or "Lettering".
- Card states: ready-to-use fonts show a checkmark; locked (premium) fonts show a download/upgrade button.
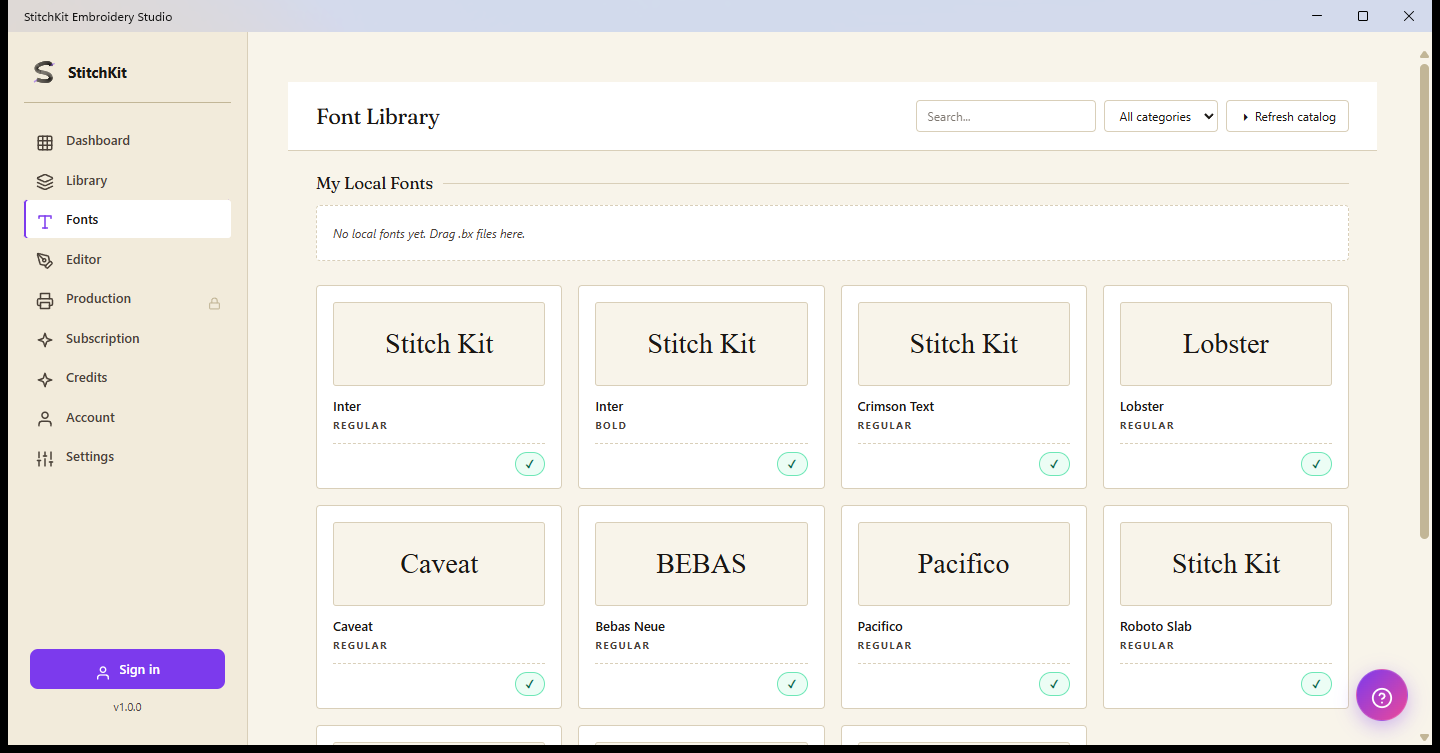
"Font Library": preview cards, "Search...", categories and "Refresh catalog".
Importing BX fonts — "Drag .bx files here"
The "My Local Fonts" section at the top of the page holds the BX fonts you've imported yourself. When you have no fonts yet, you'll see the message "No local fonts. Drag .bx files here."
- Drag and drop your Embrilliance .bx font files onto this area.
- Once the import finishes, each font is listed as a card under "My Local Fonts" with a preview image, its name and its glyph count.
- To remove a local font, use the "uninstall" button on its card.
The BX fonts you import become selectable in Step 2 of the text wizard, under the "BX font (installed)" font source.
Note — The BX font format is a closed format; StitchKit parses the file on a best-effort basis. On some fonts the character mapping may differ from what you expect, or some characters may come through missing. If the result isn't what you expected, try re-importing the font. For Turkish-specific characters, system fonts are more reliable.
Cloud fonts and the catalog — "Cloud fonts" / "Refresh catalog"
- The cloud fonts in the library come from the online catalog. Unlocked fonts can be downloaded and made available; premium fonts may require the relevant plan.
- The "Refresh catalog" button in the top right reloads the most current font list. While refreshing, the button changes to "Refreshing...".
- You need to be signed in to download a font; if you're not signed in, a download attempt redirects you to the sign-in page.
Windows — If there's no internet connection, an offline notice appears at the top of the page and only unlocked (offline-available) fonts are listed. When the connection returns, use "Refresh catalog" to get back to the full list.
The monogram wizard — "Monogram Wizard"
For classic 2- or 3-letter monograms, use the "Monogram Wizard". This wizard has 2 steps: "Letters" and "Style & Colour".
Step 1 — "Letters"
- Enter your monogram's initials in the "FIRST INITIAL", "MIDDLE (LARGE)" and "LAST INITIAL" fields. Each field takes a single character.
- By tradition, the middle letter is usually the first name's initial and the two outer letters are the last name's. Only the middle letter is required; you can create a single-letter monogram too.
- Pick a layout from the "STYLE" dropdown: "Diamond" — 3 letters; the middle one large, the outer ones small (classic Southern style). "Stacked" — Three letters at equal size, side by side. "Single" — Just the single middle letter.
- If you're not sure, open the "What is a monogram style?" panel to read traditional and modern ordering suggestions.
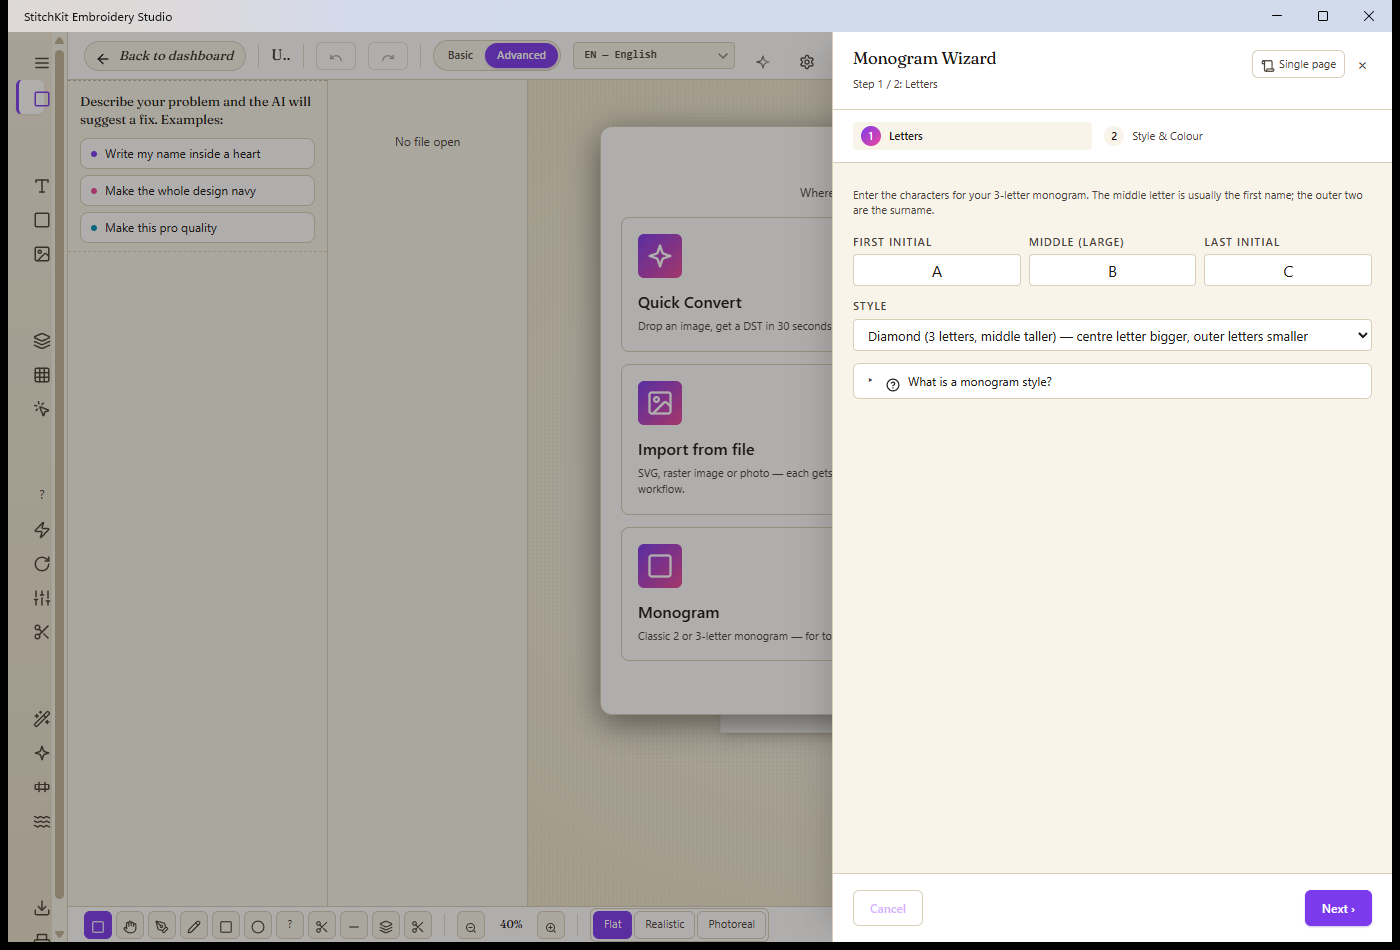
Step 1 "Letters": First / Middle (Large) / Last letters and the "Style" selection.
Step 2 — "Style & Colour"
- "SIZE (MM)" — Enter the monogram's size (roughly 20–100 mm).
- "COLOR" — Pick the thread color.
- "FONT" — Choose a font family: "Georgia" (serif — classic monogram), "Times", "Helvetica" (sans-serif — modern) or "Verdana".
- "Add circular border" — Check this box to add a circular frame around the letters.
On this step, too, a summary box shows the letters, style, font, size and border state. Add the monogram to your design with "Finish".
Tip — The "Diamond" style suits formal, classic work; "Stacked" gives a vertical/balanced look; and "Single" is ideal for a clean, minimalist monogram. A serif font (Georgia/Times) feels traditional, while a sans-serif font (Helvetica/Verdana) feels more modern.