Canvas Editing
The editor screen is made up of three areas: the toolbar at the top (file name, undo/redo, mode selector), the canvas in the middle, and the right/left panels (layers and properties). This is where you select, position, resize, and set the stitch density of your design. This section covers how you handle everyday editing on the canvas.
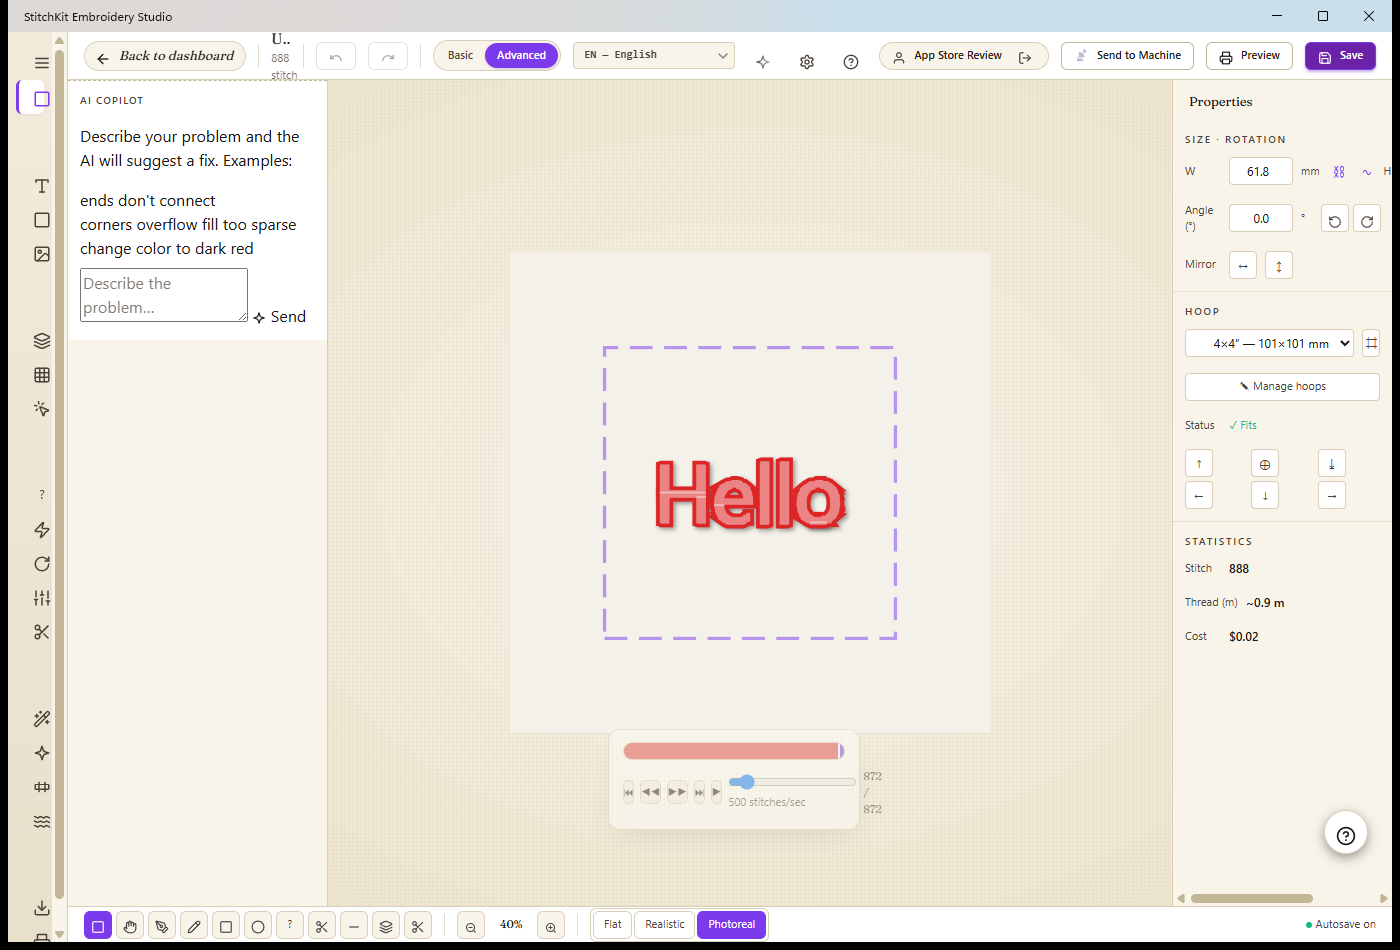
Editor: canvas in the middle, "Properties" panel on the right, tool and preview bar at the bottom.
Selecting and moving
The square-icon "Select" tool on the bottom toolbar is the default tool; you can also pick it from the keyboard with V. To move an object:
- Make sure the "Select" tool is active on the bottom bar.
- Click and hold on a color block or an existing selection; StitchKit automatically selects the block you clicked.
- Drag the pointer to move the object to its new position, then release.
By dragging on an empty area, you can draw a rectangular marquee and select all the stitches that fall inside it. You can delete the selected stitches with Delete or Backspace.
Tip — Press Esc to cancel the selection or the active tool. Esc closes, in order, the open sheet, the active tool, the selection, and the selected block, starting from the topmost layer.
The "Properties" panel
In the "Properties" panel on the right, you set the dimensions and transforms of the selected design.
- Size — "W" / "H" (mm): You can type the width and height values directly in millimeters. The chain icon (⛓) between the fields locks the aspect ratio; while it's locked, changing one dimension scales the other proportionally.
- "Preserve density" (∿): When this button is on, extra stitches are added as you scale the design up, so it doesn't look sparse at the larger size. Keeping it on is recommended when scaling up small designs.
- "Angle (°)": Enter the rotation angle in degrees. The two quick buttons beside it rotate the design by −90° and +90°.
- "Mirror": Mirrors the design ↔ horizontally ("Mirror X") or ↕ vertically ("Mirror Y").
The "Statistics" section at the bottom of the panel shows the total stitch count, the approximate thread length (m), and the estimated cost ($).
Hoop and the "Status: Fits" fit indicator
In the "Hoop" section of the "Properties" panel, you select the hoop you'll stitch your design in. The dropdown offers preset sizes (e.g., "4×4″ — 101×101 mm", "5×7″ — 127×177 mm), with a "— No hoop —" option at the top.
- Pick the hoop that suits your machine from the dropdown.
- If you've chosen a rectangular hoop, the ↻ button next to it lets you rotate the hoop 90° to try a portrait/landscape layout.
- The ⌗ button shows/hides the hoop frame on the canvas (keyboard H).
- With a hoop selected, the fit status appears on the "Status" line: "✓ Fits" means the design fits inside the hoop, while "⚠ Out of bounds" means it spills over.
The six-way button grid below the "Status" line aligns the design relative to the hoop: ↑ top, ⊕ center, ⤓ fit to hoop ("Fit"), ← left, ↓ bottom, → right. If you're seeing "Out of bounds," you can use ⤓ Fit to shrink the design so it fits inside the hoop, or ⊕ to center it.
The "Manage hoops" button opens the hoop manager, where you can add your own custom hoop sizes. The custom hoops you add are saved and appear in the list alongside the preset hoops.
Note — The fit check compares the design's bounding box against the hoop's center-referenced inner dimension. To leave an edge margin when you actually stitch it out, it's safer to keep the design slightly inside the hoop boundary rather than pushing it right up against the edge.
Preview modes: Flat / Realistic / Photoreal
From the "Preview mode" group on the right side of the bottom bar, you choose how the design is displayed:
- "Flat" — A flat, fast rendering. Stitch lines are shown plainly; it's the smoothest mode while you're editing.
- "Realistic" — A realistic top-down thread texture; it gives you a better sense of how the job will sit on the machine.
- "Photoreal" — A perspective, photorealistic fabric-plus-thread preview. This mode requires an upgraded subscription (Starter); if you don't have access, a "PRO" badge appears on the button and it can't be selected.
"Density" settings
The Density sheet manages how densely stitches are laid down and the stabilizing stitches appropriate to the fabric. It opens from the "Density" tool in the left panel. This is a large sheet made up of separate tabs.
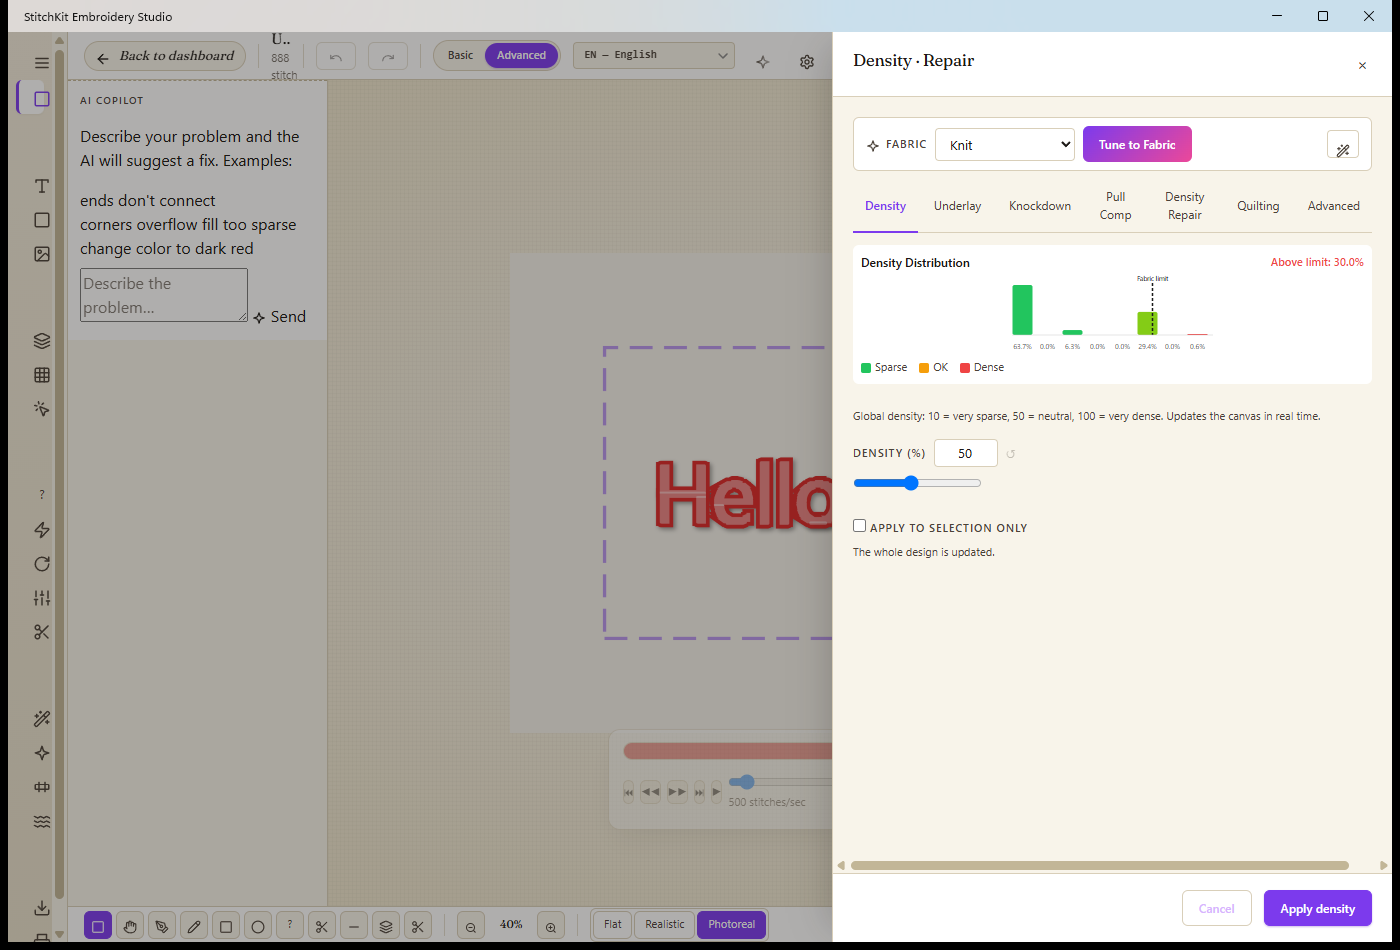
The "Density" sheet: "Fabric" + "Tune to Fabric" at the top, with the density histogram and tabs below.
Tuning to the fabric — "Tune to Fabric"
- Select the fabric type from the "Fabric" dropdown at the top of the sheet (e.g., knit, woven).
- Press the "Tune to Fabric" button. StitchKit recalculates the density, underlay, and pull-comp values for the fabric you selected, all in one go.
- If you want a visual fabric picker and preview, click the wand icon to the right of the fabric strip to open the Save2Sew wizard.
The density histogram and "Above limit %"
At the top of the "Density" tab is the "Density Distribution" histogram. The bars use color to show how sparsely or densely the regions in the design are stitched: green = Sparse, orange = OK, red = Dense.
- The dashed vertical line marks the "Fabric limit" threshold — the density limit the fabric you chose can handle.
- The "Above limit: %X" value in the top right gives the proportion of regions that remain above this limit. The lower this figure, the lower the risk of thread breaks and fabric puckering.
Tabs and applying
The tabs on the sheet manage different stitch settings:
- "Density" — The overall density slider. The range runs from 10 (very sparse) to 100 (very dense), with 50 being neutral; the canvas updates instantly as you drag. With the "Apply to selection only" checkbox, you can apply the setting either to just the selection or to the whole design.
- "Underlay" — The anchoring stitches laid down before the main stitching (zigzag, mesh, edge). Knit fabrics need a stronger underlay.
- "Knockdown" — A pre-stitch that flattens fluffy fabrics like towel and fleece; you set the coverage (bounding box / follow shape), direction, row spacing, stitch length, and color.
- "Pull Comp" — Expands shapes to compensate for the fabric pulling in. It's adjusted with an amount (mm) and a smoothing window.
- "Density Repair" — Thins out overly dense regions to reduce thread breaks and thread buildup.
- "Quilting" — Quilted fill patterns like echo, meander, and stippling.
- "Advanced" — Only shows in Advanced mode; offers independent pull-comp for the left/right/top/bottom edges (Wilcom-style asymmetric compensation).
- Select the relevant tab and set the values with the sliders/dropdowns.
- Press the "Apply" button in the bottom right to commit the settings to the design. The button label changes to match the selected tab (e.g., "Apply density").
- To back out, use the "Cancel" button.
Note — The density features are protected by a "PremiumLock" that requires an upgraded subscription; if you don't have access, the sheet shows an upgrade warning.
The node editor
When you draw a free-form shape with a Bezier path, you can edit the curve's control points visually on the canvas. When you select "Edit nodes" from the Bezier path panel, the sheet closes and the node editor layer opens on the canvas.
- You move the shape's corners by dragging the square-shaped anchor points.
- Right-click an anchor to change its type: "Corner", "Smooth", or "Symmetric".
- You adjust the curve's arc by dragging the handles of the selected anchor.
- Click the segment between two anchors to insert a new node in between.
When you finish editing, exit the editor; the changes carry over to the Bezier sheet, where you pick the stitch mode and turn it into stitches with "Apply". This feature, together with the Bezier path, unlocks with an upgraded subscription.
Layers / color blocks
The layers panel on the left lists the design's color blocks in order; the total color count appears in the header. Each row shows the block's color, its name, and the stitch count in that block.
- Eye icon (👁): Hides/shows the block. Hidden blocks aren't drawn on the canvas but remain in the design.
- Color swatch: Click it to open the quick thread picker; from there you can also switch to the full color picker.
- Handle (⠿): Drag and drop a row to change the stitching order of the blocks.
- Groups: Right-click a row to group multiple blocks together, then rename or ungroup the group. The eye on the group header hides/shows all the blocks in the group together.
- Using the dropdown at the top of the panel, you can map all colors to a thread brand at once ("Match all to brand") or import your own thread list.
Undo / Redo
The undo and redo buttons on the top toolbar undo or reapply the most recent operations; when there's nothing to do, the buttons are disabled. Keyboard shortcuts:
- Ctrl+Z (⌘Z on macOS) — Undo.
- Ctrl+Shift+Z (⌘⇧Z on macOS) — Redo.
Zoom and pan
- Use the magnifier buttons on the bottom bar to zoom in and out; the percentage between them shows the current zoom level. From the keyboard, + / − do the same, and 0 resets the view (fit-to-view).
- With the hand tool, you pan by dragging the canvas; from the keyboard, the Space key temporarily switches to the hand tool. You can also always pan with the mouse's middle button.
Windows — The mouse wheel zooms the canvas in and out. To pan, switch to the hand tool (Space) or hold the middle button and drag.
Tablet — A two-finger pinch gesture zooms; a two-finger drag pans the canvas. On iPad, a two-finger twist gesture rotates the canvas and snaps to 15° increments.
Basic and Advanced editor mode
The "Basic" / "Advanced" switch on the top bar determines how much of the interface is shown:
- "Basic" — A focused, pared-down tool set. Recommended for beginners.
- "Advanced" — Opens up all the panels and professional features (e.g., the density "Advanced" tab, and PRO tools like the node editor).
Tip — To switch quickly between the two modes, you can use the Ctrl+Shift+A (⌘⇧A on macOS) shortcut. When you try to open a locked PRO feature in Basic mode, StitchKit shows the upgrade page.