Saving, Transferring, and Sending to the Machine
This section covers how to save the design you're working on, export it to machine formats, back your library up to the cloud, and send the file straight to your embroidery machine. Some steps work differently on a computer (Windows) than on a Mac or tablet, so watch for the platform-specific notes.
Saving (Save / Autosave)
The "Save" button in the editor's top bar writes your design to disk. The shortcut Ctrl+S (Cmd+S on Mac) does the same thing.
- If you're saving a design for the first time, StitchKit writes the file straight to your library under an automatic name (like
Untitled 2026-07-04 …); no separate "save as" window opens. The default format is DST (.dst). - When you press "Save" on a previously saved design, the file is written to the same location without asking again (a quick save). A notification confirming the save appears in the bottom bar.
- If you want to change the format, file name, or location, use the "Save As" page (see below).
Windows — The first save is written silently to your library folder on Windows; to open the folder, you can use the "Open Folder" button on the Library page.
macOS — Before the first save, the app may ask you to choose a folder for the library. The folder you pick becomes the permanent home of your library, and your designs are written there.
Tip — The "Autosave on" indicator in the editor's bottom bar tells you your work is being safeguarded in the background. Even so, deliberately hitting "Save" after an important step is the safest way to write the design to your library in your chosen machine format.
Save As and Format Options (Save As)
The "Save As" page lets you choose the file name and the embroidery machine format. The format drop-down offers these writable formats:
- DST — Tajima; the widest compatibility and StitchKit's default.
- PES — Brother / Bernina (also offers a version selection, see below).
- JEF and JEF+ — Janome.
- EXP — Melco / Bernina.
- VP3 — Husqvarna Viking / Pfaff.
- XXX — Singer / Compucon.
- U01 — Barudan.
- SHV — Husqvarna Viking (legacy).
- SEW — Janome (legacy).
- HUS — Husqvarna.
- VIP — Husqvarna Viking / Pfaff (legacy).
- Type a name in the "File name" field.
- Pick the format that suits your machine from the "Format" list.
- If the format is PES, an extra "PES version (machine compatibility)" field appears. If your machine can't open the file, try a lower version (e.g. "PES v1 — Widest compatibility"); for newer Brother models, higher versions (v8/v10) are appropriate.
- If you like, check the "Remove hidden stitches when saving (recommended)" box. This option only cleans the invisible stitches — those buried under later color blocks — out of the exported file; the file you're working on stays as-is.
- Write it out with "Save". The saved path is shown on screen under "Saved to".
Note —
.pecfiles can be opened, but StitchKit uses PES when writing. Also, since sequin commands can't be preserved as machine commands in formats other than DST, sequins are automatically converted into stitched rings so they stay visible.
Pattern Library
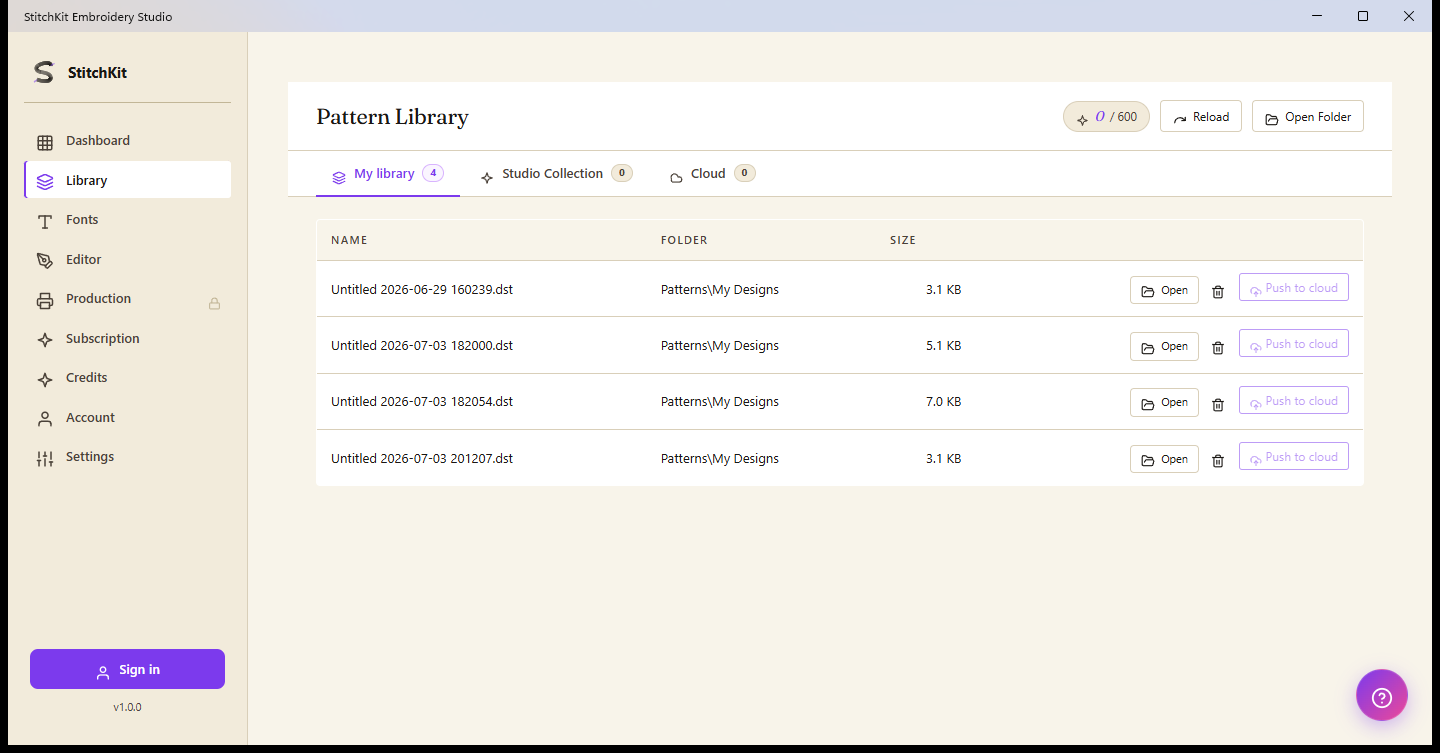
The Library page — tabs, row actions, and the top toolbar buttons.
The Library page has three tabs:
- "My library" — the designs you've saved to your computer. Each row shows the name, folder, and size.
- "Studio Collection" — StitchKit's ready-made design collection; you can buy designs with credits and add them to your library.
- "Cloud" — the designs in your cloud backup (see the Cloud Sync section below).
On the "My library" tab, each row offers these actions:
- "Open" — opens the design in the editor.
- Delete (trash icon) — a confirmation dialog appears before deleting; the action can't be undone. The color/group/effect sidecar files next to the file are cleaned up too.
- "Push to cloud" — uploads a single design to the cloud. This button is only enabled if you're signed in.
The toolbar buttons at the top of the page:
- "Reload" — re-scans the library from disk (to see files added from outside the app).
- "Open Folder" — opens the library folder in your operating system's file manager.
Tip — To scan files from a folder outside the library, you can pick files with "Open Folder", view your chosen files as a temporary list, and bring them into the editor with "Open".
Cloud Sync and Version History
The "Cloud" tab backs your designs up to your account and syncs them across your devices. You need to be signed in to use this feature.
- Upload a single design with "Push to cloud", or reconcile them all with "Sync now" on the "Cloud" tab.
- The sync status is summarized alongside it in the form "{synced}/{total} synced · {uploading} uploading · {downloading} downloading". You can download and open a design from the cloud with "Open"; the downloaded file's integrity is verified against a content digest (SHA-256).
- The "History" button on each design's row lists the design's recent versions. To roll back to a previous state, use the "Restore this version" button.
How many devices can sync at once depends on your subscription (tier):
| Subscription | Cloud device count |
|---|---|
| Free | No cloud sync |
| Starter | 1 device + version history |
| Pro | 3 devices + priority support |
| Ultimate | Unlimited + 100 GB storage |
Note — When your cloud storage fills up, the upload gives a "Storage quota full" warning; upgrade your subscription or delete old designs. If your session times out, you'll be asked to sign in again.
Send to Machine
The "Send to Machine" button in the editor's top bar writes the design in the format preferred by your chosen machine profile and transfers it to a destination. This is a Pro feature; if the button is locked, the upgrade screen opens.
The panel that opens walks through three steps in order:
- 1. "Which machine?" — Choose one of your saved machine profiles. If you have none, add a new one with "+ Add new machine", defining the brand, hoop size, maximum stitch count, and preferred format.
- 2. "Where to?" — Choose the destination. The available destinations vary by platform.
- 3. "Warnings" — StitchKit shows its hoop-fit and stitch-count checks. If there are no issues, it reads "No warnings — ready to send". Then send it with the "Send" button; a progress bar appears during the transfer.
The destination choice varies by platform
Windows — The destination is a plugged-in USB drive. When you plug in a USB stick, it appears in step 2 of the panel as "USB: {label} …"; the design is written to the USB in the selected format. If no USB shows up, the panel gives a "Plug in USB" warning; plug in the stick and the panel refreshes automatically within a few seconds. Then plug the USB into your machine and open the file from the machine.
macOS — The destination is offered through the system's share sheet: "AirDrop", "Send via email", or "Save to iCloud". The file is prepared in the selected format and handed to the share sheet.
Tablet — On iPad, the transfer is also done through the share sheet (AirDrop / email / iCloud). Route the file to a destination that suits the method your machine supports (e.g. a cloud folder or a wireless transfer app).
Hoop-fit and stitch checks
- If the design fits the selected profile's hoop, StitchKit gives the confirmation "Design {w}×{h}mm — fits hoop"; if the edge margin is very small, it shows a warning.
- If the design is larger than the hoop, a "⚠️ Design exceeds hoop" warning appears and blocks the "Send" button. Shrink the design, rotate it, or choose a profile with a larger hoop.
- If the stitch count exceeds the profile's limit, a ⚠️ warning again appears; the send is blocked.
Tip — For designs larger than the hoop, use the editor's Multi-Hoop split feature to save each section as a separate file, then send them one by one.
Note — If the send fails, an error notification appears in the panel (e.g. the USB is read-only, or the drive is full or has been ejected). Make sure the USB is writable and has enough free space, then try again.