Digitizing (Image to Stitches)
Digitizing means turning an image or drawing into real stitch data your machine can run (for example .dst). StitchKit starts this from the "Welcome" screen you see when the editor opens. Of the three tabs across the top, the "Make" tab lists every creation option as a card.
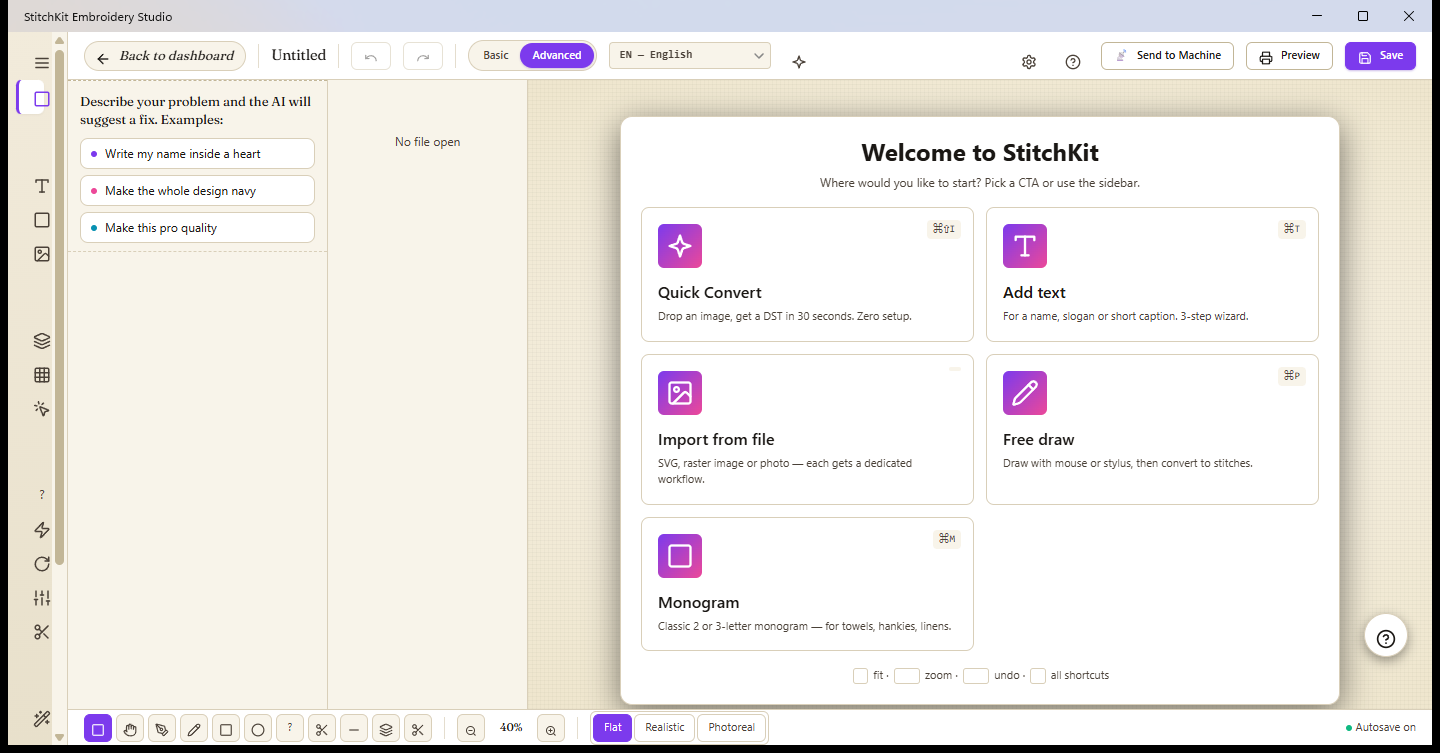
The "Welcome" screen — creation cards on the "Make" tab.
Creation cards at a glance
- "Blank Canvas" — Pick a hoop and start from scratch.
- "Open File" — Opens an existing
.dst / .pes / .jef / .exp / .vp3 / .xxxfile. - "Convert Image" — SVG / PNG / JPG → automatic stitch design. Covered in detail below.
- "Photo → Embroidery" — Turns a photo into PhotoStitch through a 3-step wizard.
- "New Lettering" — Names, monograms, tags; converts lettering into stitches.
- "From Template" — Opens ready-made starter designs (the Inspire tab).
- "Tune to Fabric" — Adjusts an existing design's density/underlay/pull compensation to suit the fabric.
Quick Convert: "Convert Image"
The fastest way to turn an image into embroidery in seconds is the "Convert Image" card. The card opens a source picker that branches into different workflows depending on the source type; each option connects to a separate engine suited to that kind of image.
- On the "Welcome" screen, while on the "Make" tab, click the "Convert Image" card.
- In the source picker that opens, choose one of four routes: SVG (vector), "Magic Wand" (raster tracing), "Photo → Embroidery" (photo → PhotoStitch) or a cross-stitch grid.
- Select the file. StitchKit parses the image and shows the colors/shapes it detects as a list.
- For each row, review the stitch type (Satin, Tatami, outline, etc.) and color, then hit generate. The result drops onto the canvas; from there you can save it or send it to the machine.
Tip — If your goal is "drop it in and get a DST in seconds": use "Magic Wand" for clean logos/clipart, "Photo → Embroidery" for photos, and SVG for line art/vector graphics. The right source type means the least manual cleanup.
Importing from a file — a separate workflow for each type
The source type determines which engine runs behind the scenes:
SVG (vector)
Each path inside the SVG is read as a separate element. For every element, StitchKit automatically suggests a stitch type based on the shape's area and aspect ratio: long, thin shapes become Satin, broad bodies get a Tatami fill, and very small shapes become a running outline. You can change the suggestions individually in the list, and simplify paths with boolean operations (Union, Intersect, Difference, Xor, Flatten).
Note — If a non-vector file is opened through the SVG route, the app redirects you to "Magic Wand" for raster.
Raster image (PNG / JPG) — "Magic Wand" tracing
Raster images are processed with "Magic Wand". The image is reduced to a small number of color buckets using k-means in perceptual (Lab) color space; each bucket is turned into closed-region contours and filled with stitches region by region. You can adjust the number of colors, the target width (mm) and the contour-simplification tolerance. Ideal for logos and clipart with clean edges.
Photo → PhotoStitch
For photos, the dedicated "Photo → Embroidery" wizard is used; details below.
Free drawing ("Free draw")
If you want to draw from scratch, open a blank canvas with "Blank Canvas" and use the editor's pen/shape tools. The line you draw with a mouse or stylus is converted to stitches instantly, according to the fill mode you've chosen.
- From the toolbar, choose the Pencil, rectangle or ellipse tool.
- Pick one of the fill modes at the bottom (e.g. outline, Satin, Tatami, Motif).
- Draw on the canvas; when you lift your finger/mouse, the drawing turns into a stitch block and is added to the current design.
Tablet — If you enable pressure sensitivity (Pressure) while drawing with a stylus, the line width varies with pressure.
Note — Turning a drawing into stitches and adding it to the canvas requires the editing feature; this step is unlocked on Starter and higher plans.
How does PhotoStitch work?
The "Photo → Embroidery" wizard has 4 steps: 1) Source — choose the photo, 2) Fabric — choose the backing fabric, 3) Adjust — color/size/dither settings, and 4) Generate. A "Single page" (Quick mode) button can collapse these steps onto a single scrolling page. The engine processes the photo like this:
- Perceptual (Lab) color quantization — The image is reduced to a small number of colors with k-means in CIE-Lab space. Because the clustering is done in perceptual space rather than raw sRGB, colors are grouped "as they look" and tones don't shift.
- Bucket-based region fill — Each color bucket is extracted into closed contours and filled with real Tatami fill (clipped to the contour). Blocks are ordered light to dark, so darker colors land on top and define the edges.
- Fabric awareness — When you choose a fabric color, color buckets perceptually very close to it can be dropped (fabric drop); that is, areas near the background are left empty so the fabric itself shows through.
- Dither (optional, recommended) — Floyd–Steinberg error diffusion visually blends neighboring threads with a halftone pattern, giving smoother transitions on photos.
What you can adjust in the wizard:
- Color count / Color buckets — How many thread blocks (colors) get generated. On the wizard's "Adjust" step, "Color count" is a 3–12 slider; in the separate "Photo Stitch" panel, the same value is a numeric "Color buckets" field ranging 3–20.
- "Target width" — The design's final width; the aspect ratio is preserved.
- "Hoop" — If you pick a hoop, the target width is adjusted automatically so it fits comfortably in the hoop.
- "Fabric" — Density/compensation presets are applied based on the fabric you select.
- "Dithering" and (in the region engine) "Remove background" — To process only the subject without stitching the background.
There's also an "Auto-digitize (region-based)" option: for clean logos/clipart it splits the image into regions and applies Satin/Tatami per region (instead of a photographic halftone fill). When generation finishes, you can bring the result onto the canvas with "Open in Editor" or save it directly with "Save Now".
Tip — The photo engine gives cleaner results on textured/gradient images, while "Auto-digitize" is better on logos with flat color blocks. If you're not sure, try both and compare the preview on the canvas.
Credit cost and what each plan unlocks
Automatic digitizing and AI-assisted generation spend AI credits; credits are deducted from your account when generation starts and require you to be signed in. Reference costs for the generation operations that consume credits:
| Operation | Credits |
|---|---|
| Automatic digitizing / PhotoStitch generation ("auto_digitize") | 25 |
| Background removal ("background_remove") | 5 |
| Sketch → stitch ("sketch_to_stitch") | 20 |
| AI Copilot message / semantic search | 1 |
Plan (tier) thresholds for the features:
| Feature | Required plan |
|---|---|
| SVG import ("SVG Import") | Starter+ |
| Free drawing / stitch editing (adding to the canvas) | Starter+ |
| "Magic Wand" (raster tracing) | Pro+ |
| "Photo → Embroidery" (PhotoStitch) | Pro+ |
| Cross-stitch grid from an image | Pro+ |
Note — If your plan isn't enough, the relevant card opens an upgrade (paywall) notice; the operation doesn't start and no credits are deducted. Credits are only spent when real AI generation runs — opening a file, previewing or importing an SVG doesn't consume credits.